Integrating with Clio Identity (Single Sign-on with Clio)
Clio Identity is the authentication and identity provider that powers Clio’s applications. Integrating with Clio Identity as a third-party developer allows you to use Clio’s single sign-on (SSO) capabilities, which make it easy for Clio users to securely sign in and access your application. Using Clio as an identity provider in this way is similar to offering sign-in using Google, Apple, or any number of other SSO services. At a high level, your application is letting Clio handle the process of logging users in, and simply asks Clio who a user is after authentication is complete.
Building SSO into your application has tangible benefits for both developers and users. For developers, it lowers complexity when building account management and removes the need to build and maintain your own authentication system. For users, it means fewer logins and passwords to remember and manage, as well as a consistent sign-in experience that provides access to Clio’s security features like two-factor authentication.streamlining account management
This document outlines the technical details of understanding and implementing SSO with Clio in your application.
The SSO Workflow
Clio’s single sign-on follows the OpenID Connect (OIDC) spec to provide an identity layer on top of the OAuth 2.0 protocol. Signing in with Clio is a multi-step process that follows these steps:
- A user initiates the SSO process from your application’s login screen (this is normally done using a “Sign In with Clio” button — see the “Creating a ‘Sign in with Clio’ button” section below for details).
- Your application sends the user to the Clio Identity login screen, where they provide their username and password.
- The user authorizes your application to access their identity information.
- Clio Identity redirects the user back to your application with an authorization code.
- Your application exchanges the authorization code for an ID Token and Access Token.
- Your application verifies the validity of the ID token and, if needed, uses the Clio Identity access token to get identity information about the user such as name and email.
Prerequisites for Implementation
To start building your integration with Clio Identity, send us an email at api.partnerships@clio.com and include the following details:
- Application name
- Redirect URL(s): The URL(s) to which Clio Identity will redirect the user after they successfully authenticate and authorize your application. Please include the development and production URL(s), if possible. Note that we do not currently support
localhostas a valid redirect URL.
Once we receive your email, we’ll respond to your request with a temporary secure note in 1Password containing your Clio Identity App Key and App Secret. You should document the key and secret somewhere secure, as the 1Password note does expire after 24 hours.
Implementing SSO With Clio
Creating a 'Sign in with Clio' button
Including a 'Sign in with Clio' button on your application's login screen is the simplest way to promote your support of the Clio single sign-on functionality to your users.
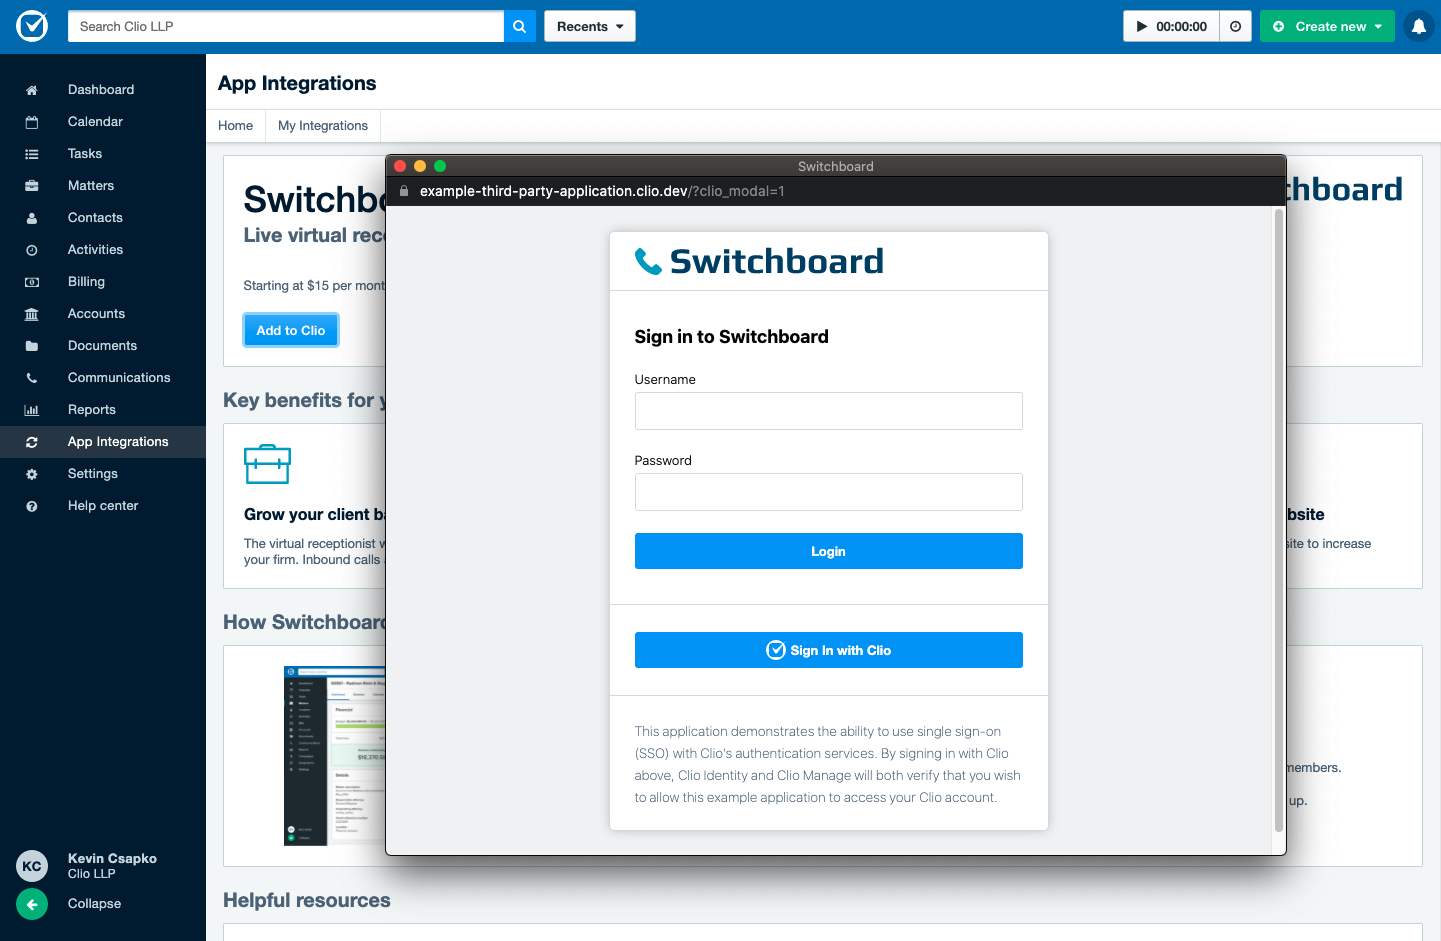
An example of a “Sign In with Clio” button on an application’s login screen.
To ensure the button meets Clio's accessibility and brand guidelines—and to allow customers to have a consistent experience across all services using single sign-on with Clio—we have provided a styling guideline, including downloadable assets for reference.
Redirecting to Clio Identity
When a user clicks the “Sign in with Clio” button, your application needs to redirect the user to https://account.clio.com/oauth2/auth. You must provide several query parameters in the request to successfully initiate the authentication process:
| Parameter | Definition |
|---|---|
response_type | This specifies the response type to be returned after authorization. Clio Identity currently supports the "code" response type, which requests that an authorization code be returned. |
client_id | Your Clio Identity App Key. |
redirect_uri | The URI to which the user will be sent after authentication. This must match one of the redirect URLs you provided via email — see “Prerequisites” above for more information. |
scope | Scopes you’re requesting to access during authorization. Clio Identity currently supports the "openid" scope. |
state | A nonce you provide that will be returned to you in the callback, so you can validate the callback came from a request you made. This parameter is required to adhere to Section 10.12 of the OAuth RFC for protection against Cross-Site Request Forgery. |
Here’s a sample Ruby method performing this initial step:
def authenticate_with_identity
  identity_state = SecureRandom.hex
  cookies.encrypted[:identity_state] = identity_state

  params = {
    response_type: "code",
    client_id: ENV["CLIO_IDENTITY_APP_KEY"],
    redirect_uri: "https://abcapplication.com/identity_callback",
    scope: "openid",
    state: identity_state
  }

  redirect_to "https://account.clio.com/oauth2/auth?" + params.to_query
end
The method first creates a random state value and saves it in a cookie for later verification. It then constructs the query parameters for the request. Our Clio Identity app key is stored as an ENV variable for security purposes, and in this example, we would have provided https://abcapplication.com/identity_callback as a callback URL to app.partnerships@clio.com before starting to build our integration.
Lastly, we construct the redirect URL and redirect the user to the Clio Identity authentication URL using the redirect_to method.
From the user’s perspective, their browser will send them to the login screen for Clio Identity and they’ll be asked to sign in. After doing so, the user will be prompted to give permission for your application to access their Clio Identity information based on the openid scope provided in the request:
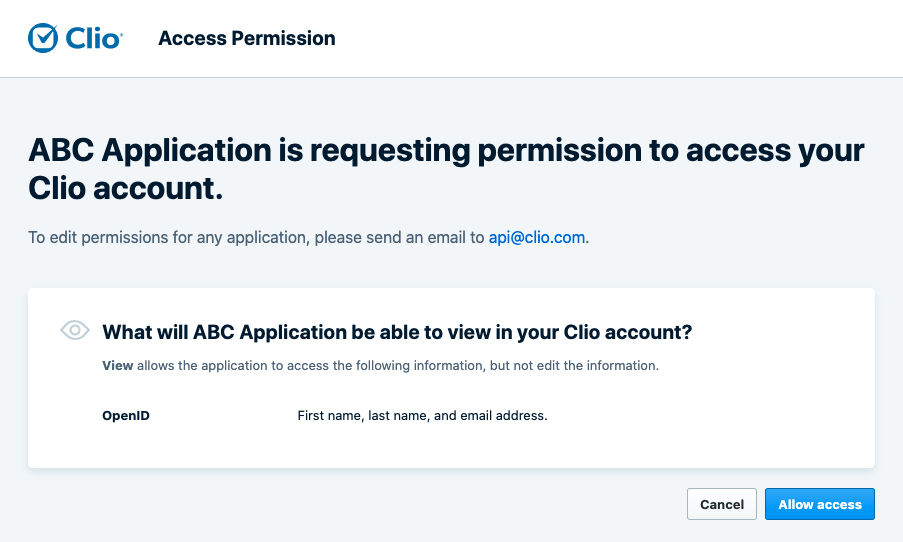
Once the user authorizes your application to access their Clio account, they will be redirected to the redirect URL you provided in the request’s query parameters.
Handling the redirect
If the user grants your application access, your application can now fetch Clio Identity-related information from the user’s account. We’ll explain what a failed approval looks like later in the guide.
When Clio Identity sends the user to the redirect URL, it will send the following values as query parameters:
code: the authorization code you can now use to exchange for tokensstate: this should be the same value as the state you sent to the server in your initial request. If the state provided here does not match the one you’d originally set in your original redirect, your application should treat this as an error and not proceed with authorization, as there’s a chance your application is the target of a cross-site request forgery attack.
Using the authorization code, you can now request the Clio Identity id_token and access_token for the user. This is done by making a POST request to https://account.clio.com/oauth2/token and sending the following values in the request body:
| Parameter | |
|---|---|
code | This is the authorization code provided by Clio Identity. |
client_id | Your Clio Identity App Key. |
client_secret | Your Clio Identity App Secret. |
redirect_uri | This should be the same redirect URI that you provided in the original GET request to Clio. It’s used for validation within the identity provider. |
grant_type | The type of OAuth grant being requested — in this case, authorization_code. |
A sample Ruby method for handling this callback would look something like this:
def identity_callback
  if !params[:state].present? || params[:state] != cookies.encrypted[:identity_state]
    # The state either wasn’t returned or doesn’t match the state we generated; either way, it’s an error.
    return
  end

  identity_token_url = "https://account.clio.com/oauth2/token"
  token_params = {
    client_id: ENV["CLIO_IDENTITY_CLIENT_ID"],
    client_secret: ENV["CLIO_IDENTITY_CLIENT_SECRET"],
    grant_type: "authorization_code",
    code: code,
    redirect_uri: ENV["ROOT_URL"] + "identity_callback"
  }

  response = HTTP.post(identity_token_url, form: token_params)
end
Validating the response
The response from the /oauth2/token request contains a number of fields, including:
id_token: a JSON Web Token (JWT) which encodes a number of pieces of data, including the user’s first and last name and email address (in thefirst_name,last_name, andemailfields, respectively)access_token: An OAuth access token for making API requests to Clio Identity (note: there are currently no available API endpoints in Clio Identity, and as such, this token isn’t used for anything)token_type: The type of token that’s been returned (the value of this should beaccess_token).refresh_token: An OAuth refresh token to retrieve a new access token when the current one expiresexpires_in: The lifetime (in seconds) of the access token before it expires.
As an OIDC/Oauth client, you must validate the response to ensure a malicious actor isn’t imitating the Clio servers or tampering with the information in any way. Since OIDC is built on top of OAuth, the response object contains information pertaining to both standards and requires different layers of validation:
- You must validate the OAuth portion of the response. This includes validating the presence of access_token, token_type, refresh_token, and expires_in parameters. Section 5.1 of the OAuth RFC contains more information about this
- Validating the ID token is done in two steps:
- Decode the ID Token using the appropriate keys and algorithm. Clio Identity uses the “RS256” algorithm, and its public keys can be found at https://account.clio.com/.well-known/jwks.json.
- Validate the structure of the token and the claim values. Follow the ID Token validation rules in Section 3.1.3.7 of the Open ID specs.
- (Optional) Validate the access token according to the process in Section 3.1.3.8 of the Open ID spec.
The exact process of how to perform token validation will be dependent on your implementation’s language, framework, and so on. The process can be made easier with the use helper libraries—see jwt.io's Libraries page for more information. There are also a number of resources explaining token validation in more detail (the OIDC Spec and Okta’s guide are good places to start) if you want to learn more.
The code sample below expands the identity_callback example method above to parse the response, decode the JWT, and validate the ID token. It uses the Ruby JWT library to assist in this process.
def identity_callback
  # Previous Code Above

  response = HTTP.post(identity_token_url, form: token_params)
  parsed_response = JSON.parse(response.body)

  # The response has to be decoded (using the RS256 algorithm) and then validated (following the Open ID specs).
  decoded_token = decode_and_validate_identity_token(parsed_response["id_token"])
end

def decode_and_validate_identity_token(identity_token)
  jwks_response = HTTP.get("https://account.clio.com/.well-known/jwks.json")

  json_web_keys = JSON.parse(jwks_response.body)["keys"]

  decode_options = {
    algorithm: "RS256",
    iss: "https://account.clio.com",
    verify_iss: true,
    aud: [ENV["CLIO_IDENTITY_CLIENT_ID"]],
    verify_aud: true,
    verify_iat: true,
    jwks: {
      keys: json_web_keys.map(&:symbolize_keys)
    }
  }

  decoded_token = JWT.decode(identity_token, nil, true, decode_options)[0]

  # This performs token validation as per the OIDC spec
  if (decoded_token["sid"].present? && (!decoded_token["azp"].present? || decoded_token["azp"] == ENV["CLIO_IDENTITY_CLIENT_ID"]))
    decoded_token
  else
    raise InvalidTokenError.new("token missing sid or has invalid azp value")
  end
  rescue JWT::DecodeError => e
    raise JwtDecodeError.new(e.message)
  end
end
Once the response is validated, the user has been successfully signed in! At this point, depending on the needs of your application, you may wish to create an account for the user in your application and pre-populate it with the values found in the ID token such as name and email address.
You do not need to store the user’s ID token beyond the user’s active session. Since token validation must occur every time SSO is used, there’s no benefit in storing the token in any long-term sense.
Error Handling
The authorization grant that occurs in the “Redirecting to Clio Identity” section above can fail for a number of reasons. In the case of a failure, Clio Identity will send the user to your Redirect URI and add query parameters to provide context about the error that occurred. You’ll want to include error handling in the callback handler’s application logic to check for these parameters and handle failures accordingly.
Query parameters returned can include:
error: The error message itselferror_description: A more detailed description of why authorization failed.error_hint: In certain error cases, this field will contain contextual information about the failurestate: The state value sent by your application to prove the validity of the response.
Some common error scenarios are outlined below.
Invalid Credentials
This can occur if a user is not yet able to use single sign-on with their Clio account — for example, if the user account has just been created. In this case, the callback URL would look like the following:
https://abcapplication.com/identity_callback?error=invalid_credentials&error_description=Your+email%2Fpassword+is+invalid.&error_hint=%7B%22email%22%3A%22%5BREDACTED%5D%22%2C%22clio_connect%22%3Afalse%7D&state=3bcbd0901ca4ad01
Transformed to a JSON payload, this error looks as follows:
{
  "error": "invalid_credentials",
  "error_description": "Your email/password is invalid.",
  "error_hint": "{"email":"[REDACTED]","clio_connect":false}",
  "state": "3bcbd0901ca4ad01"
}
Access Denied
This can occur if a user declined to authorize your application’s use of the openid scope.
The callback URL would look like as follows:
https://abcapplication.com/identity_callback?error=access_denied&error_description=The+resource+owner+denied+the+request&state=00e7c06b25b753c13df39d158492b7de
And, when transformed into a JSON object:
{
  "error": "access_denied",
  "error_description": "The resource owner denied the request",
  "state": "00e7c06b25b753c13df39d158492b7de"
}
Sample Repository
We have a GitHub repository with a sample implementation demonstrating how to integrate with Clio Identity and allow Clio users to use Single Sign-on with Clio in an application. The application is built using Ruby on Rails, but the general workflow is extendable to your framework of choice.
The application also shows how to integrate with the Clio Manage API — after authenticating a user with Clio Identity, the application automatically enters the Clio Manage Authorization flow.
Next Steps and Support
After implementing SSO with Clio, you may wish to further your application's capabilities by integrating with the Clio Manage API. If your application already integrates with the API, we recommend looking into adding support for the "Add to Clio" workflow to make it even easier for users to connect their Clio account to your application.
If you have any trouble implementing SSO with Clio, please reach out to us at api@clio.com and we’ll be happy to help!