Implementing "Add to Clio" in Your Application
One of the key benefits of the new App Integrations page within Clio Manage is allowing users to easily connect their Clio account with your integration via an “Add to Clio” button. This button, and the workflow that powers it, acts as a shortcut for users to quickly authorize your integration to use the Clio API, without requiring the user to leave the Clio Manage UI. This guide is intended to help you implement support for this flow in your codebase.
For more information about our App Integrations page as a whole, see "Featuring your app within Clio Manage".
Prerequisites
- You’ve built your integration with the Clio API. Specifically:
- You've built the OAuth authorization flow for your application.
- You’ve completed the steps to get listed on the App Directory.
Workflow
The Add to Clio flow is largely the same as the standard OAuth Authorization flow that you’ve already built into your application. The key difference is that the flow is initiated from within Clio Manage, rather than within your application.
The standard OAuth Authorization flow with Clio’s API is as follows:
- From within your application, a user initiates authorizing your app to use Clio Manage on their behalf, usually through a button or link.
- Your application redirects the user to the OAuth scopes authorization page in Clio and the user accepts the scopes.
- Clio redirects the user back to your application with an authorization code as a query parameter.
- Your application exchanges the authorization code for an access token.
The Add to Clio workflow, by comparison, removes the first step and adds new steps at the beginning and end. The workflow looks like this:
- A user clicks “Add to Clio” on your integrations page within Clio Manage.
- Clio opens a new window to your Add to Clio URL. If needed, the user signs into your application.
- Your application redirects the user to the OAuth scopes authorization page in Clio and the user accepts the scopes.
- Clio redirects the user back to your application with an authorization code as a query parameter.
- Your application exchanges the authorization code for an access token.
- Your application redirects a user to
https://app.clio.com/app_integrations_callback. The temporary window closes and the integration is added to the user’s “My Integrations” page in Clio Manage.
Implementation
Implementation details for supporting Add to Clio will vary based on how your application is built. It’s possible you may be able to reuse most of your existing code for OAuth authorization with one or two key differences.
Below is an example of a simple Rails implementation of OAuth authorization with Clio’s API. In this section we’ll walk through adding support for the Add to Clio flow.
Here’s the code, which defines a controller for the admin section of our application. We’ll walk through it in detail after the sample.
class AdminController < ActionController::Base
  before_action :authenticate_user

  def authorize_clio_manage
    manage_state = SecureRandom.hex
    cookies.encrypted[:manage_state] = manage_state
    redirect_to manage_authorize_url(manage_state)
  end

  def clio_manage_callback
    # Make a request for the Clio Manage access token.
    response = HTTP.headers("Content-Type" => "application/x-www-form-urlencoded").post(manage_token_url(params[:code]))
    parsed_response = JSON.parse(response.body)

    # Save the token for future use
    cookies.encrypted[:clio_manage_token] = parsed_response["access_token"]
    cookies.encrypted[:clio_manage_refresh_token] = parsed_response["refresh_token"]

    redirect_to "/profile/index"
  end

  private

  def manage_authorize_url(state)
    params = {
      response_type: "code",
      client_id: ENV["CLIO_MANAGE_CLIENT_ID"],
      redirect_uri: ENV["ROOT_URL"] + "manage_callback",
      state: state,
      redirect_on_decline: true
    }
    "https://app.clio.com/oauth/authorize?" + params.to_query
  end

  def manage_token_url(code)
    params = {
      client_id: ENV["CLIO_MANAGE_CLIENT_ID"],
      client_secret: ENV["CLIO_MANAGE_CLIENT_SECRET"],
      grant_type: "authorization_code",
      code: code,
      redirect_uri: ENV["ROOT_URL"] + "manage_callback"
    }
    "https://app.clio.com/oauth/token?" + params.to_query
  end
end
The first line in the controller references a method, authenticate_user, which isn’t implemented here. This method requires that a user be authenticated in the application before accessing the admin pages. Implementing user authentication is a non-trivial task and depends heavily on the language, framework, and services you use to build your application, and is out of scope for this sample as a result. We’ll discuss how authentication plays into the Add to Clio flow in more detail below. (And, if building your own authentication system seems daunting, we highly recommend considering using Single Sign-On with Clio Identity!)
Next, there are two public methods, each representing a URL path in our application:
/admin/authorize_clio_manage: A user of our application would click a link to this URL within our application’s UI; clicking it would redirect the user to app.clio.com/oauth/authorize/admin/clio_manage_callback: This is the callback URL registered with our application in Clio Manage. After a user approves our application’s use of OAuth scopes, their browser would redirect to this URL and we would request an access token from Clio Manage via a POST request.
There are also two private helper methods to easily generate links to the Clio API authorization and token URLs.
If any of this code looks unfamiliar to you, we encourage you to investigate the “Authorization” page of our API documentation, which explains the OAuth Authorization flow in more detail.
Next, we’ll build Add to Clio support into these existing URLs!
1. Create Add To Clio URL
When a user clicks the “Add to Clio” button on your integration’s page in Clio Manage, they are sent to your application’s Add To Clio URL. This is different from your application’s redirect URLs and can only be set or changed by Clio’s API team.
The purpose of this URL is to give your application a way to know that a user is authorizing via the Add to Clio flow and respond accordingly—namely, redirecting to Clio’s /app_integrations_callback URL once authorization is complete.
Your Add to Clio URL can be a unique path in your application, but it can also be something like an existing path with a unique query parameter, which is what we’ll do for our example.
Let’s assume we provided /admin/authorize_clio_manage?add_to_clio_flow=1 as our Add to Clio URL. This means we can reuse the existing URL handler while adding a check for the add_to_clio_flow query parameter:
def authorize_clio_manage
  # NEW CODE
  if params[:add_to_clio_flow] == "1"
    cookies.encrypted[:add_to_clio_flow] = params[:add_to_clio_flow]
  end

  # EXISTING CODE
  manage_state = SecureRandom.hex
  cookies.encrypted[:manage_state] = manage_state
  redirect_to manage_authorize_url(manage_state)
end
In this updated method, if the query parameter exists, we save it in a cookie. As you’ll see in the next step, after authorization is complete, we can redirect the user correctly based on the value of that cookie.
Authentication
As mentioned above, the /authorize-clio-manage URL requires a user to be authenticated in the application before it can be accessed. If a user is not signed into the application, or does not have an account, they should be taken to a login page where they can easily sign in or sign up for an account with the application before continuing with the Add to Clio flow.
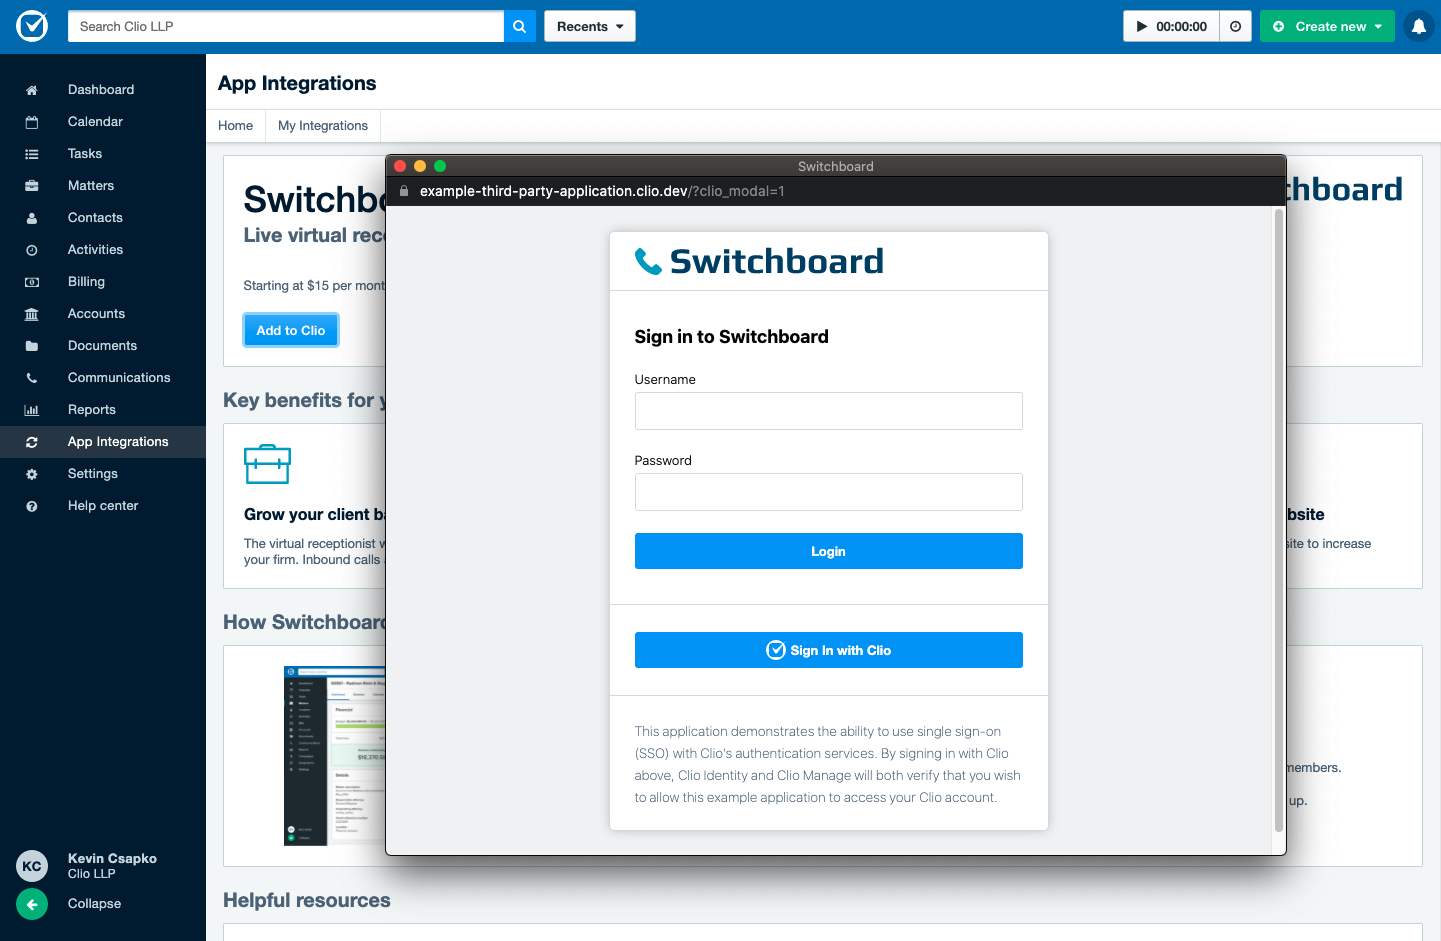
An example login page where a user would land if they clicked “Add to Clio” for a new integration.
Implementation details of handling these cases will vary by integration, but it should allow users to easily sign in as needed.
2. Redirect post-authorization
Once authorization is complete in the Add to Clio flow, your application needs to redirect to /app_integrations_callback in Clio Manage, which ends the Add to Clio authorization flow.
In our example, we’ll add code to the existing clio_manage_callback method that checks for the previously saved cookie and behave accordingly:
def clio_manage_callback
  # Make a request for the Clio Manage access token.
  response = HTTP.headers("Content-Type" => "application/x-www-form-urlencoded").post(manage_token_url(params[:code]))
  parsed_response = JSON.parse(response.body)

  # Save the token for future use
  cookies.encrypted[:clio_manage_token] = parsed_response["access_token"]
  cookies.encrypted[:clio_manage_refresh_token] = parsed_response["refresh_token"]

  # NEW CODE
  if cookies.encrypted[:add_to_clio_flow] == "1"
    cookies.delete :add_to_clio_flow

    # Create user/account in your application here
    redirect_to "https://app.clio.com/app_integrations_callback"
  else
    redirect_to "/profile/index"
  end
end
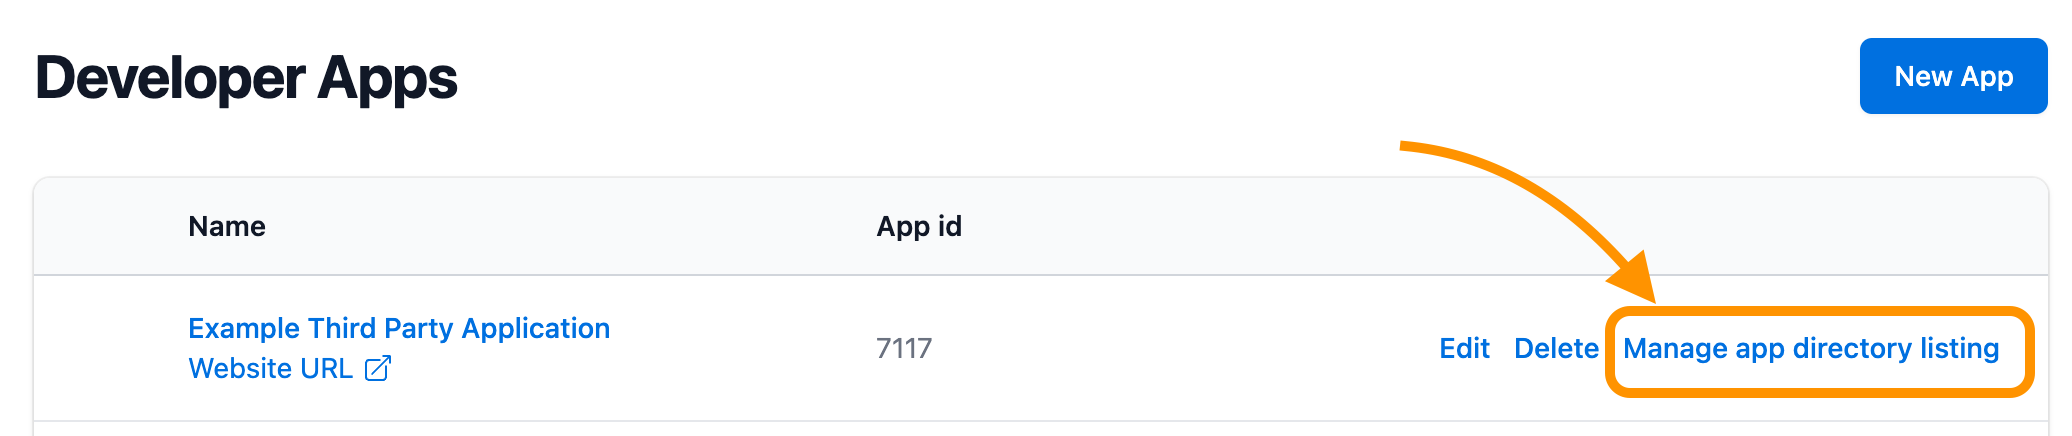
3. Add URLs to your application settings in Clio
Now that your application supports the Add to Clio flow, the final step is to add your Add to Clio URL to your application's settings. Navigate to the developer applications settings page in Clio Manage, find your application, and click the "Manage app directory listing" link.
On the "Manage app listing" form, go to the "URLs" section. There are two URLs you need to provide:
- App URL: This is the URL for your app's logged in view. After users go through the Add to Clio flow, your integration page will show an "Open App" button – when a user clicks on this button, they will be sent to the URL you provide here.
- Add to Clio URL: This is the URL to kick off the Add to Clio flow that you created in Step 1 of this guide.
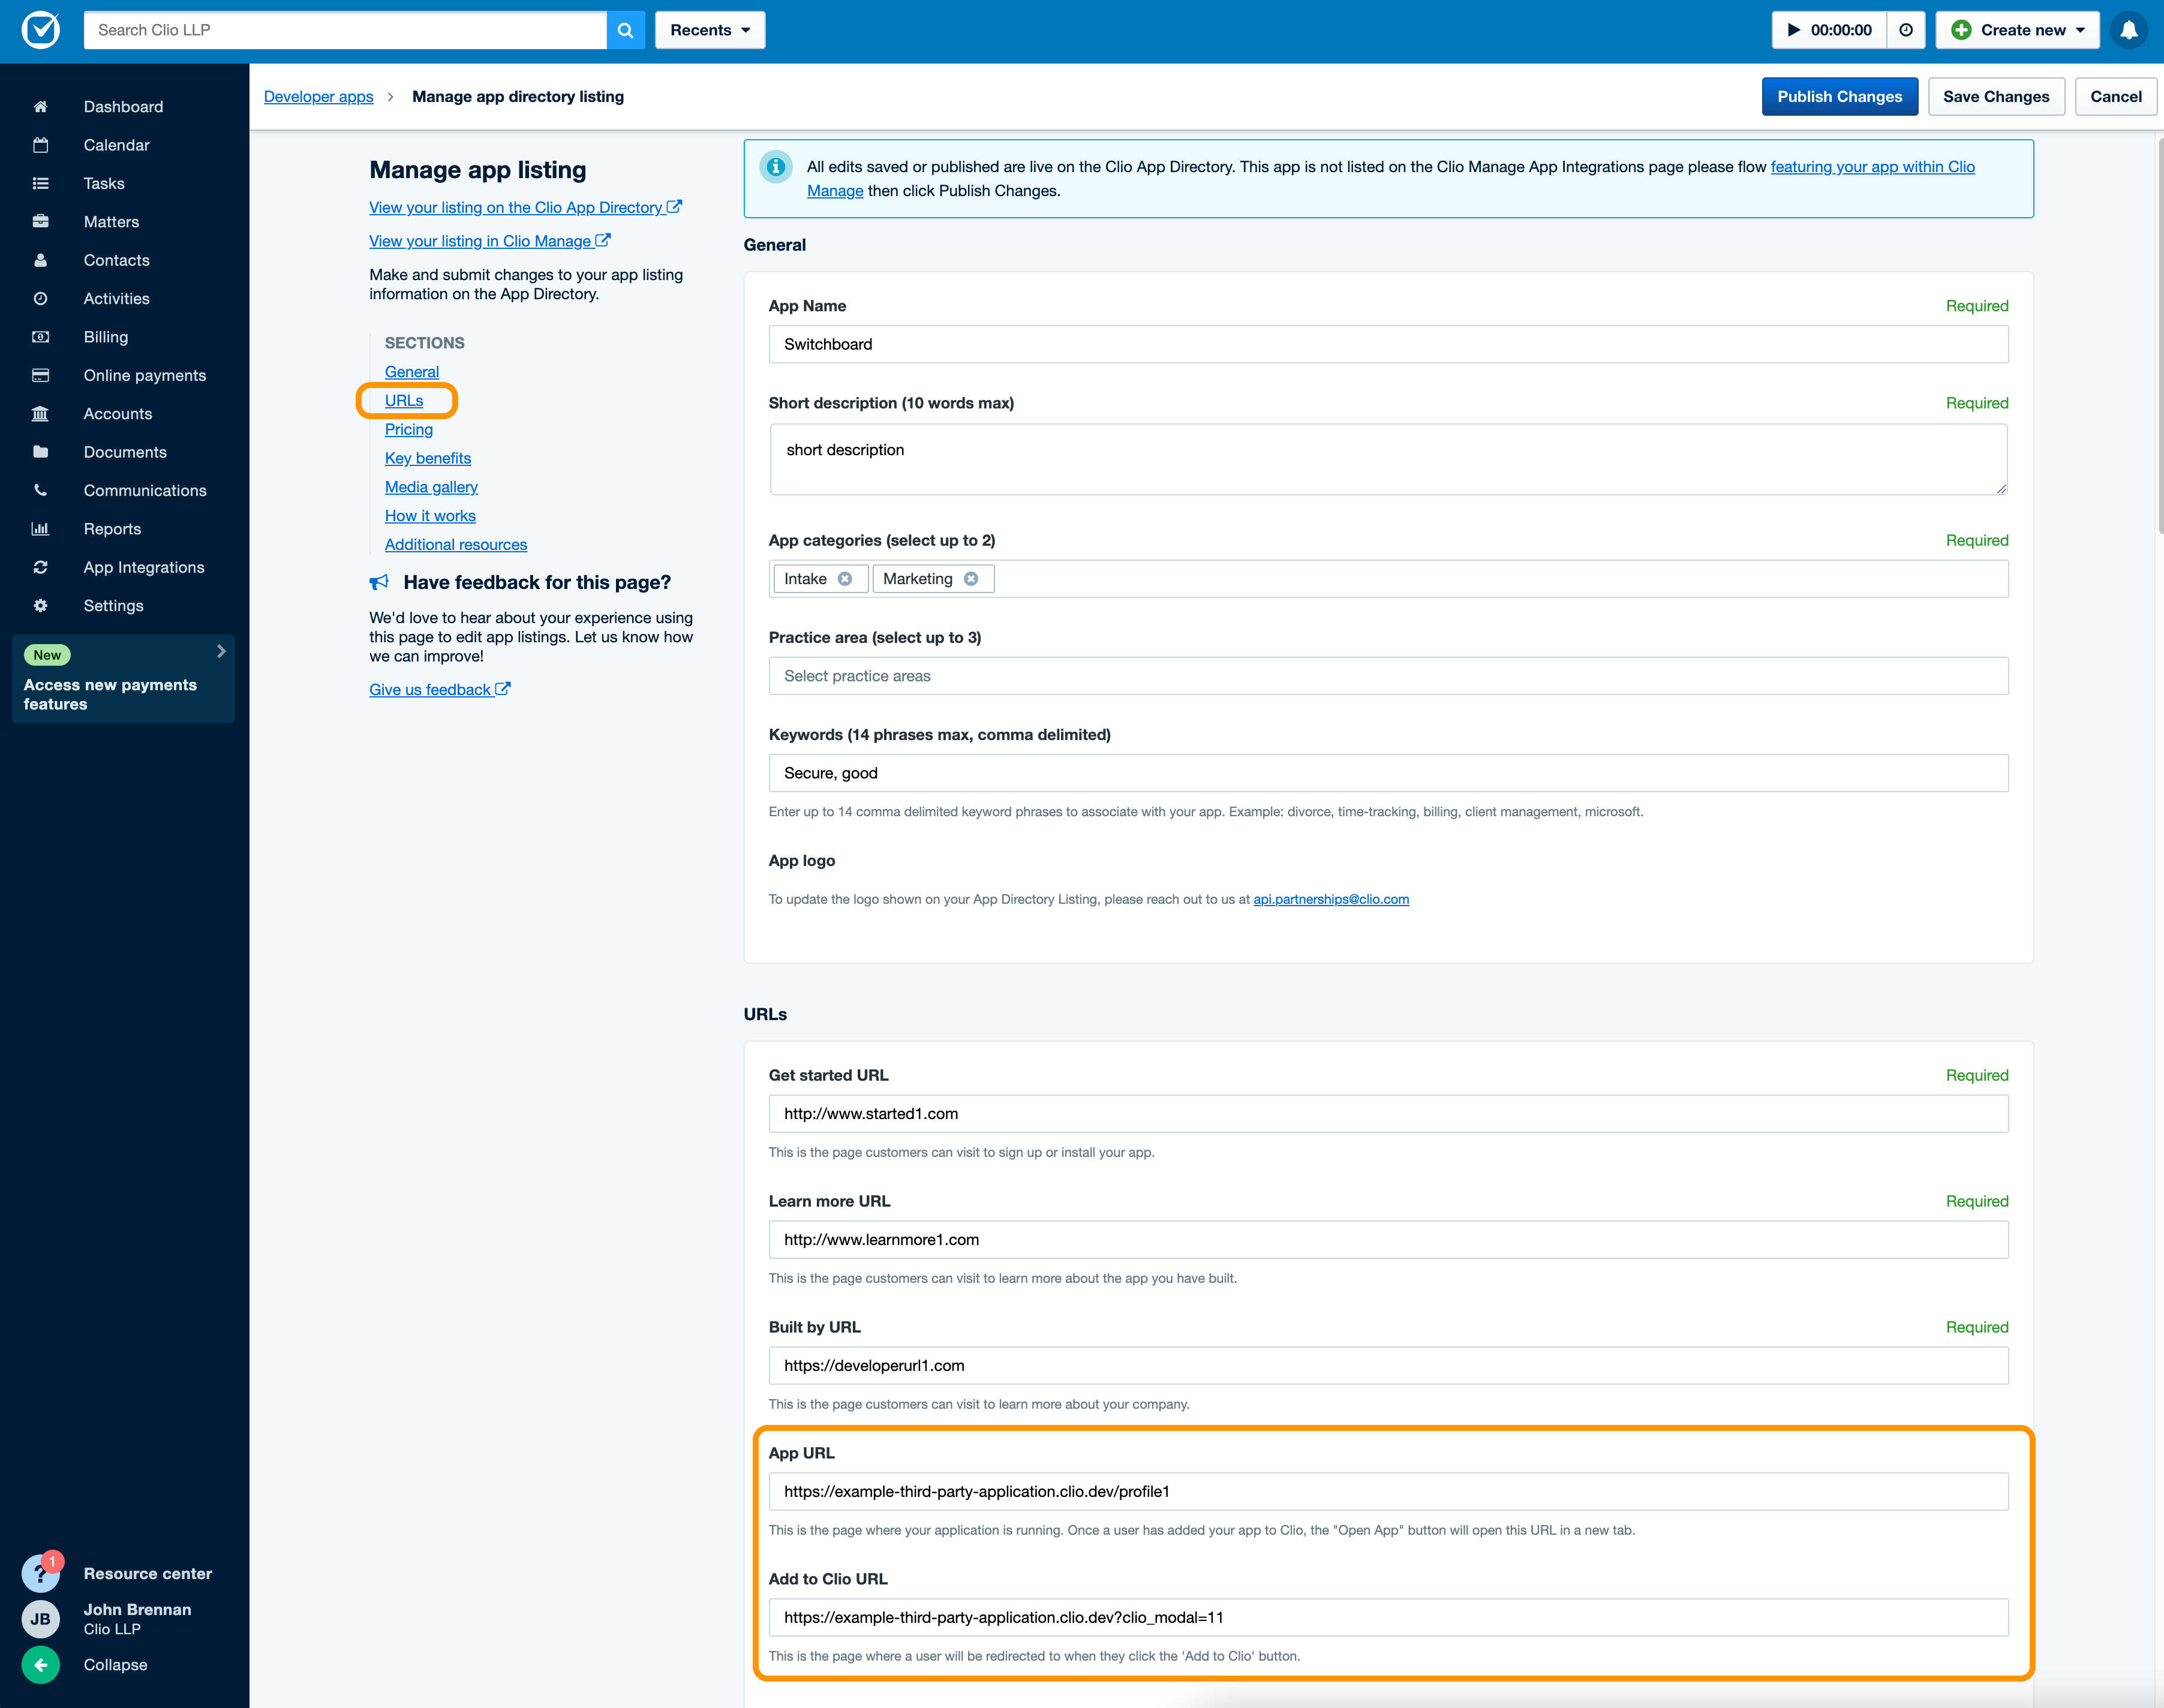
After you've added these URLs, click the blue "Publish Changes" button in the header.
By adding conditional behavior based on the add_to_clio_flow cookie, we’re able to easily support the new flow without changing anything about the existing integration code. For your users, this means that they can connect Clio to your application from either the Clio Manage App Integrations section or your own application.
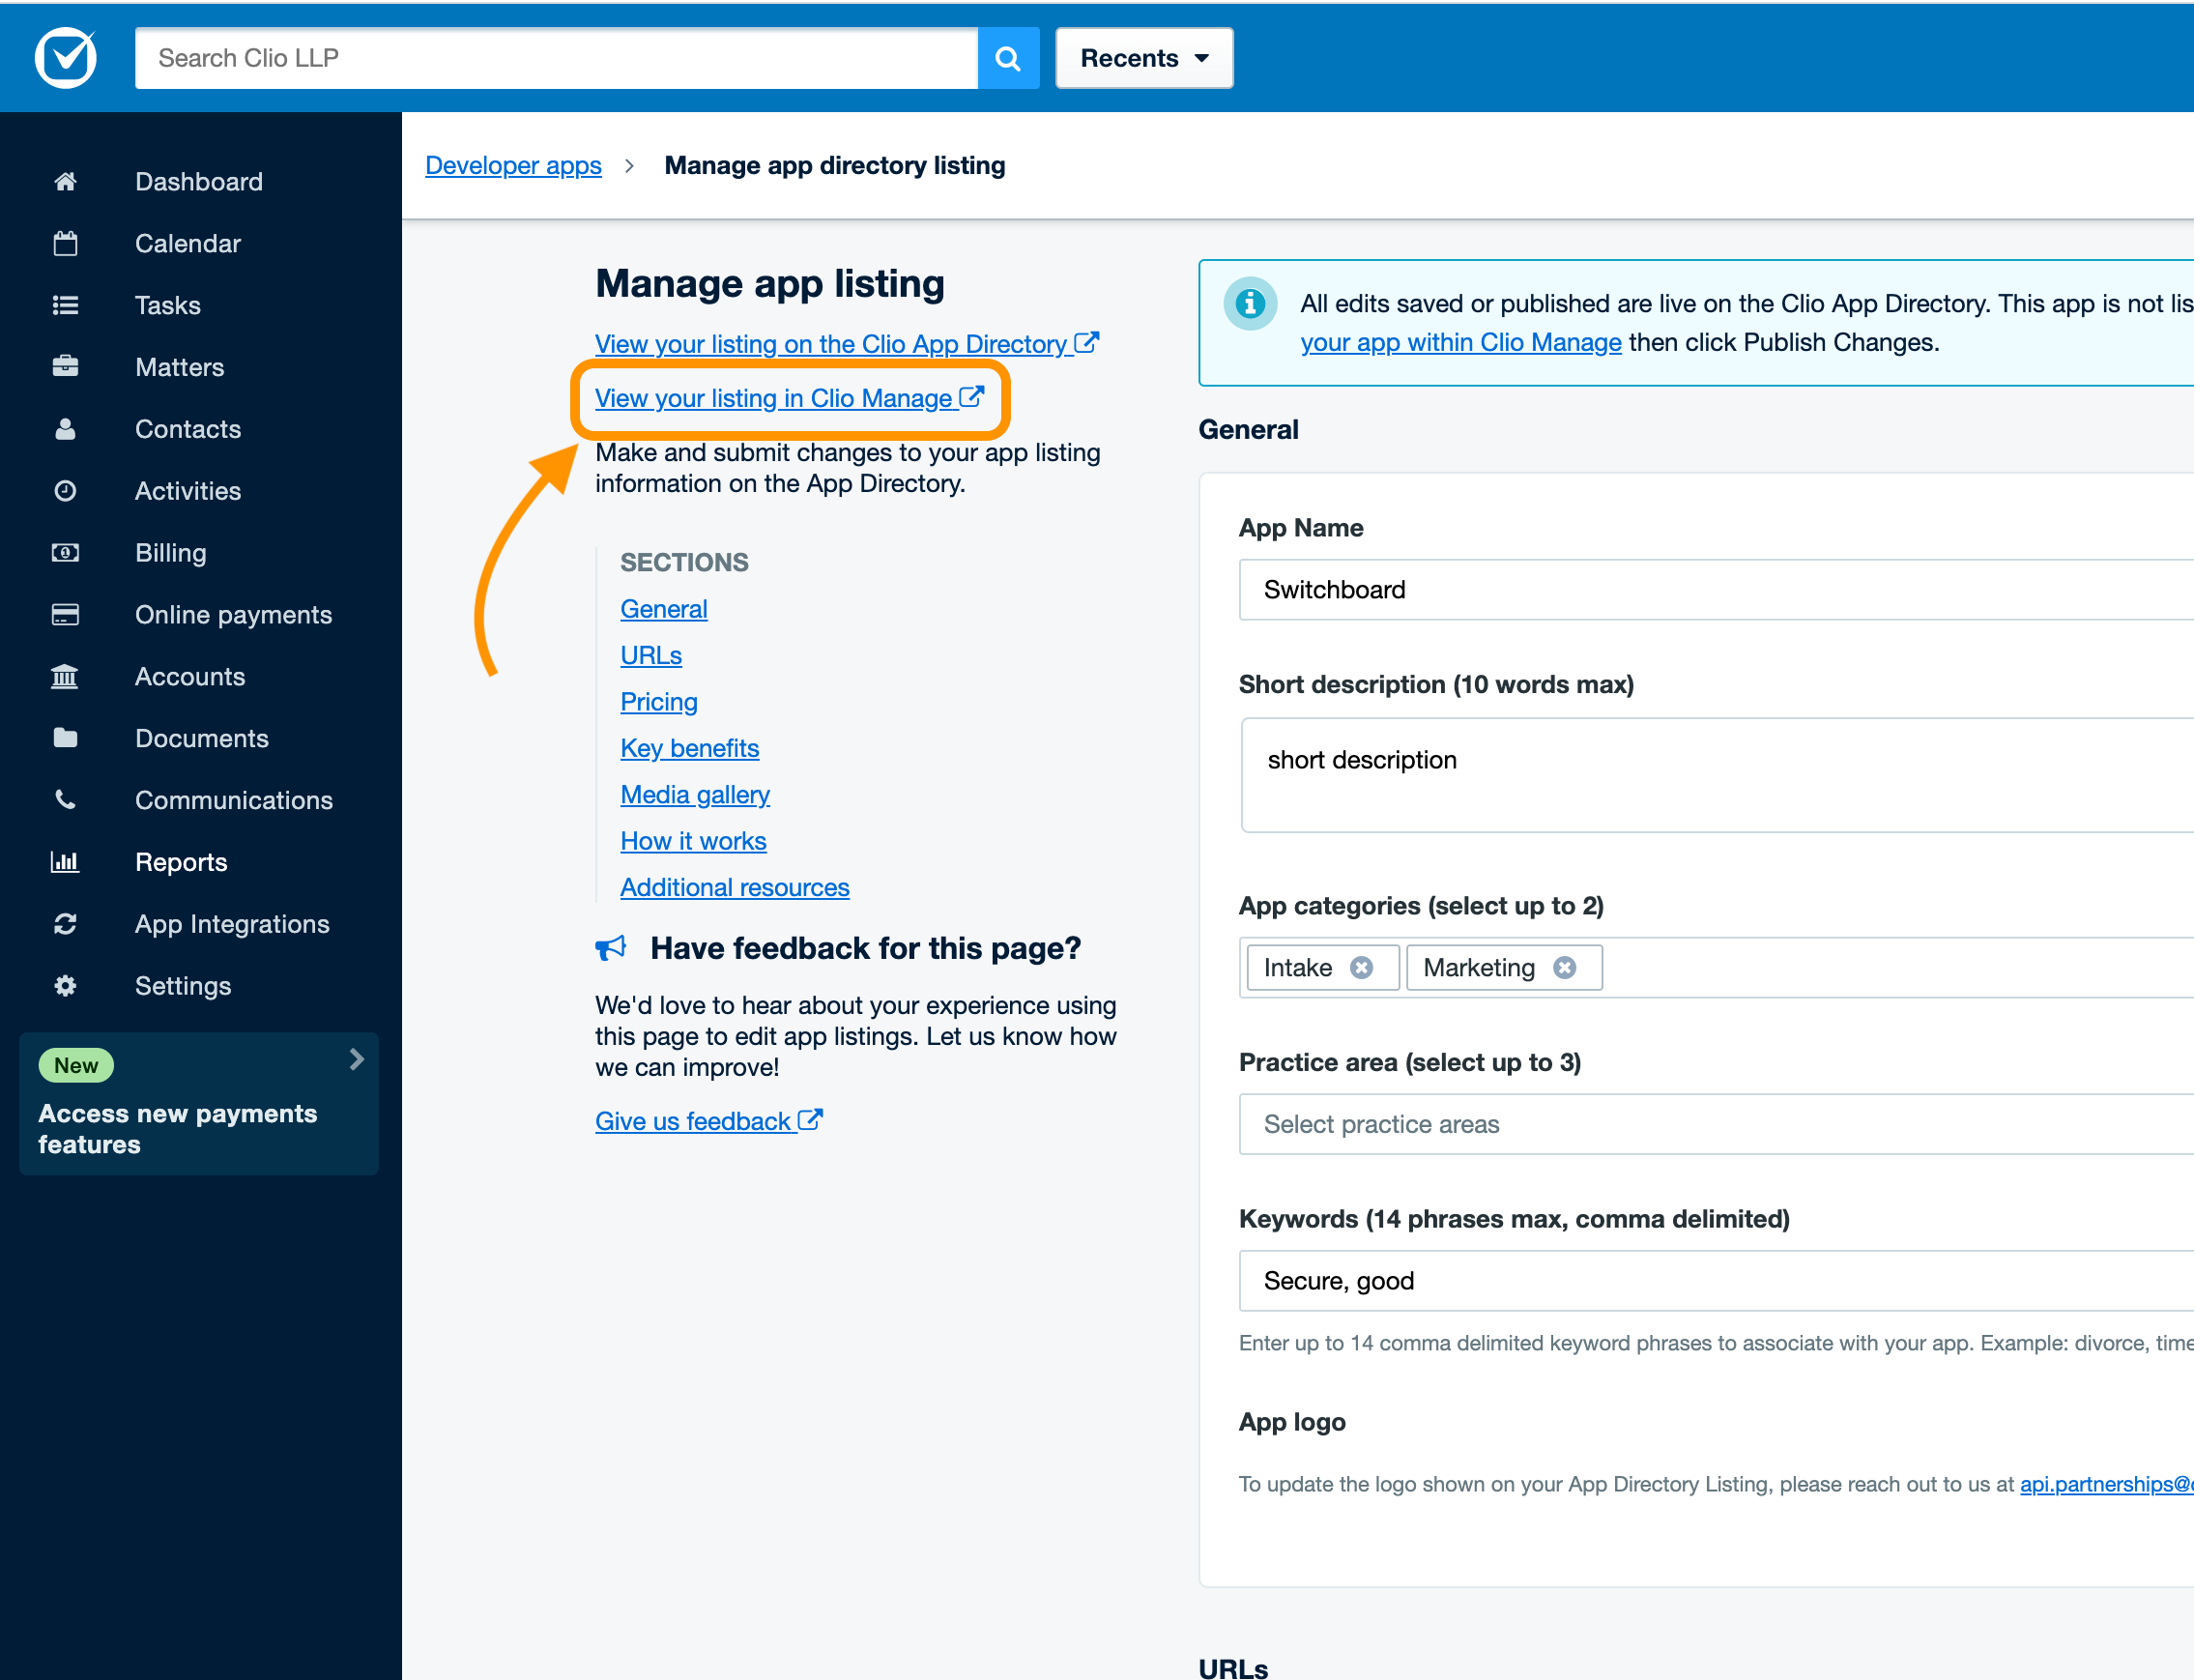
4. Test your implementation
After you've clicked "Publish changes", you can access a test version of your integration listing to test your Add to Clio implementation by clicking the "View your listing in Clio Manage" link in the left sidebar of the "Manage app listing" page.
Your app's listing page should now include the "Add to Clio" button. From here, you can test variations of the Add to Clio workflow, which are outlined in the sections below:
Adding the app from Clio Manage App Integrations app listing page
| Test Step | Expected Outcome |
|---|---|
| Check that "Add to Clio" button is shown on the app's App Integrations listing page. | "Add to Clio" is button is displayed |
| Cick the "Add to Clio" button. | The app's Add to Clio URL should be opened in a new tab |
| If required, authenticate via the app's page | The app should redirect back to Clio's OAuth scopes authorization page |
| Accept the scopes | After Clio redirects the user back to the application, the window is closed. |
| Check that the app is added to the "My Integrations" page in Clio Manage. | The app is shown under "My Integrations". "Open app", "Remove access" and "View access permissions" are shown. |
| Click "Open App" | The app is opened |
| Navigate to the app's App Integrations listing page. | The "Add to Clio" button should be replaced by the "Open App" button. |
| Click "Open App" | The app is opened |
| Confirm that the app has been connected to Clio successfully and behaves as expected | Requests to Clio Manage should be successful |
Removing the app from Clio Manage My Integrations page
| Test Step | Expected Outcome |
|---|---|
| Locate the app in the list on "My Integrations", choose "Remove access" and confirm the removal in the dialog. | The app should be removed from the list and should no longer be able to communicate with the Clio account. |
Reinstall an app that has been removed
| Test Step | Expected Outcome |
|---|---|
| Repeat the steps to add the app using the "Add to Clio" button (TC-1) | The app should be reinstalled successfully if it was previously removed |
Next steps
Once your implementation and testing is complete, you can contact our team to feature your app within Clio Manage.
Questions?
The details of your implementation will vary from the code sample above. If you have any problems with supporting Add To Clio in your integration, please reach out to us at api@clio.com with any questions you may have!